Friday, June 29, 2012
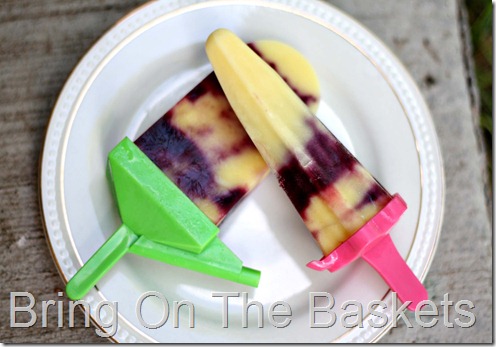
Fruit Swirled Puddin’ Pops
Yum.
In this first trial run, I used vanilla pudding and my leftover $0.99/lb cherries. It was fabulous! You could use any combination of pudding and fruit. I want to try lemon pudding with blueberries and chocolate pudding with strawberries next.
1 package instant pudding and the milk required to prepare it
1 cup fruit, fresh or frozen (cherries, strawberries, blueberries, or raspberries, etc)
1 Tbsp sugar
1 Tbsp water
First, prepare the fruit by pitting it, stemming it or whatever it requires. Then put it in a small saucepan and add the water and sugar. Bring it to a simmer over medium heat and stir it to break it up. Let it simmer for about five to ten minutes, or until it looks good and kind of syrup-y. Transfer it to a blender or food processer and make it into a nice puree. Transfer that to the refrigerator or the freezer, if you’re that impatient, and let it cool down. It takes about 30 minutes.
Next, prepare the pudding according to the directions on the package, making sure to use the “pudding” directions, and not the “pie filling” directions.
While it is still kind of runny, layer your pudding and fruit puree into popsicle molds or dixie cups. You know what else would be perfect for this? Empty Trix yogurt cups. We used to save them for my youngest to drink out of when she was tiny, because I hated having sippy cups at the dinner table. The kids just wanted to fill up on milk and not eat, so using tiny cups solved that problem. They would be reusable, as opposed to the dixie cups that would just have to be thrown away. You can get popsicle sticks at the DollarTree for, you got it, $1.
Once I had them all layered, I took a long skewer and swirled the layers around a bit.
Insert the tops to the molds, or regular popsicle sticks if you’re using cups.
Place them in the freezer for at least a few hours. The longer, the better, I say. Run water over the cups to loosen them and enjoy!
Thursday, June 28, 2012
Chicken Salad
2 cans chicken
2 stalks celery, finely chopped
1/2 cup plain yogurt
1/4 cup mayonaise
chopped onion, to taste
seasoning salt, to taste
ground pepper, to taste
Mix it all up and serve. We used Ritz crackers because that is what we had. It is also good as a sandwich, either with bread, buns or croissants. Make a green salad on the side and you have a perfect, light dinner for summer.
How to Freeze Cherries
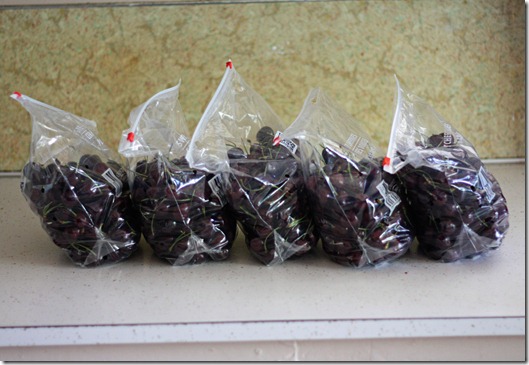
This is twelve pounds of cherries. Guess how much I paid for them. Keep in mind that in the last basket breakdown, they were $2.98/lb at my Walmart.
Did you guess?
Did you guess that they were $.99/lb?
Well, you were right! These are on sale this week at Jack’s Market, a local grocery store in Monte Vista. These five bags were a total of about twelve pounds and I froze four of the five bags.
Start by washing them. I just rinsed them off in the colander.

Then I pitted them. I bought this handy dandy cherry pitter last year and it works like a champ. I thought it was kind of a splurge, but now I don’t know how I made it through a summer without it.
Image courtesy of Williams Sonoma
Once you have them pitted, lay them out on a cookie sheet. I didn’t use wax paper underneath like I do for freezing bananas because they come off a whole lot easier.If you don’t have one of those, just use a knife to cut them in half and pit them that way. This process also goes faster if you have a little person to pull the stems off of the cherries. I guess a big person could do it, too, but I usually have at least one little person begging to help. Make sure that you get the pit completely out of the cherries. The last thing you want is to put some in a smoothie with the pit still in.
Pop them in the freezer for at least a few hours. It is possible that I’ve left them for days and they are always good and frozen at that point.
Use whatever size of freezer bags you want and bag them up. I had quart size bags, so that what I used. I got about five and a half quarts out of four bags. I need to come up with something to do with the leftover bag.
Now you have cherries to put in smoothies, desserts, syrup, or whatever else. They are also quite tasty to just eat right out of the bag, frozen and all.
Monday, June 25, 2012
Foil Pack Potatoes

I have been making these potatoes for a long time. They are perfect for summer because they take the heat out of the house. I have to tell you, this summer is killing me. The temperatures have been in the 90s for the past couple of weeks, which is abnormal for this area. I’m pretty sure that we usually only reach 90 a handful of times for the whole summer, and definitely not in June.
Anyhoo, back to the potatoes. Have you noticed yet that most of my “recipes” are just vague instructions? These potatoes are no exception. I’m going to tell you how I made them tonight, and then I will tell you a few other ways to do it. This is another one of those “recipes” that seem to be fail-proof. The only times that I’ve failed while making them was when I just didn’t cook them long enough.
3 large russet potatoes, peeled and cubed
1/4 cup onion, finely chopped
olive oil for drizzling
seasoning salt
ground pepper
heavy duty foil, or use two thicknesses
Preheat your grill.
Put your potatoes in a bowl with the onion. The smaller your cubes are, the faster your potatoes will cook. Drizzle a little bit of olive oil over the top. Shake a good amount of seasoning salt and pepper over everything. I don’t measure, but the top should be pretty orangey from the salt. Toss to coat it all evenly.
I only had regular foil, so I used two thicknesses. I have made them with only using a layer of regular foil and they have more of a tendency to burn that way. Lay either your one heavy duty layer or your two regular layers on the counter. Dump the potato mixture on top of the foil and spread it out evenly. Use another layer, or two layers, or foil on top. Fold the edges up toward the middle, making a nice package.

When the grill is hot, put the foil package on the top rack of the grill, not directly over the heat. After about fifteen minutes, turn it over. Let it cook for another 15 minutes. At this point, you can take it off the grill and very carefully undo a corner to check the tenderness of the potatoes. I say to do it very carefully because there will be steam escaping and it could burn you. The time is a variable because it depends on how big your potatoes were cut and how hot your grill is. If they aren’t quite soft enough, put them back on the grill.
I serve these right out of the foil. Why bother having to wash another dish if you don’t have to?
Now for some variations. The sky is the limit. I used russet potatoes because that is what came in the baskets this week. You could use any variety. When I use reds, I usually keep the skins on. Their skin is a lot thinner than russets, so maybe that is why you see them most often cooked with their skins on.
I like using the olive oil because of the health factor, but you could use butter or any other oil.
Instead of the seasoning salt, you could use dry ranch mix, Italian dressing mix, grilling seasoning like Montreal Chicken, etc, or Mrs. Dash’s seasoning. Or whatever else you can think of. Taco seasoning, maybe?
When I use the ranch mix, after it is done cooking, I open the package and generously sprinkle cheddar cheese on top, then close the package again for a few minutes to let the cheese melt.
So that how I do it. I’d love to hear your experiences with it, either doing it my way or your own.
Sunday, June 24, 2012
How to: lettuce

This topic seems like kind of a no-brainer, but I think it is worthy of a discussion. Lettuce is pretty cheap when you buy it by the head, instead of the pre-washed, bagged kind. I used to buy the heads all of the time, only to have it go bad before I got around to using all of it. I would usually just rip off as much as I needed and then put the rest back in the refrigerator. Or, I was just too lazy to do even that and before I knew it, it was no good anymore. I finally developed a method that works well for me. By cutting up the entire head all at once, it is ready to use anytime and I am so much more likely to use it.
Have you ever had the edges of your lettuce brown after cutting it and storing it for a day or two? Apparently, the metal in the knife speeds up the browning effect. By using a plastic knife like the one in the picture, you can delay that browning by quite a bit. Usually, I have the whole thing eaten by the time it browns. My mother-in-law bought that one for me, but I have seen them in Walmart and on Amazon. For a few bucks, I think it’s worth it.

Start by cutting off the base of the lettuce, as far up as you would like. Then cut it parallel to that first cut in whatever thickness you want. I think mine were about 1-1/2” thick. This requires a sawing motion.

Next, cut the opposite direction, again as narrow or thick as you want. If you want your pieces smaller, keep cutting until you are satisfied.

Now it is time to wash it. I use a salad spinner, which is amazing. I didn’t take pictures of this step, but I think it’s pretty self-explanatory. Put the lettuce in the spinner, wash it off good, and then put the lid on and spin the heck out of it. If you don’t have a spinner already, I suggest getting one. Mine is a cheapy from Walmart that probably cost me $5. I have seen them on Amazon for $60, so you can spend a little bit or a lot. Mine works fine.
Put it in a ziploc bag or a bowl with a lid and put it in the fridge. I have used both the bag and the bowl and either works just fine. I have kept lettuce as long as a week using this method. Now, go chop your lettuce.
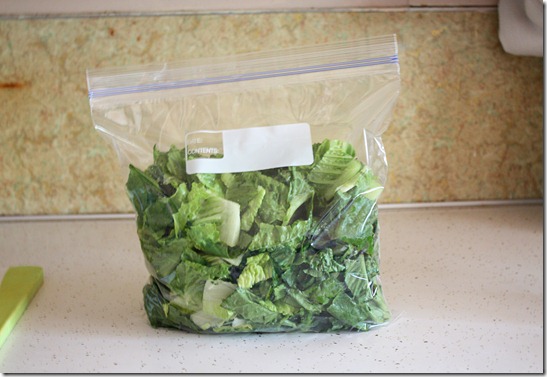
You are now ready to make a quick salad, top your tacos or put it on a sandwich.
Saturday, June 23, 2012
Basket Breakdown 6/23/12
Before I do the breakdown, I want to explain a little bit about how the process of sorting the produce works. Everything is sorted into two baskets for each participant. We are told how much of each item goes into each basket. For example, we were supposed to put two tomatoes, eight bananas, one head of lettuce, etc. Once the correct amount is put in, there is usually a few leftover, called the “case-ends”. Once the appropriate number of each item has been placed in each basket, each volunteer that came to help gets to pick an extra item to take home. Once the volunteers have all picked their items, the remaining case-ends are distributed as evenly as possible among the baskets. That is the reason why you see a couple of loose potatoes in my picture, as well as three tomatoes instead of the two that was prescribed.
Also, according to the Bountiful Baskets Facebook page, the potatoes this week either came from Rexburg, Idaho or our very own Monte Vista, Colorado! I was confused, though, when our package of potatoes didn’t say either Idaho or Colorado, and instead said Houston, Texas. It did say “Colorado Utility”, so I had a hunch that they were at least from Colorado. I did some asking around and discovered that those are indeed Mountain King potatoes, which means they were grown here! I think it is fantastic that we have only had three drops at our sites in the Valley and Bountiful Baskets is already supporting our community.
Here is how it compares with the local Walmart.
Potatoes – 5 lb bag = $2.47
Potatoes- bulk pricing – 1 lb 7 oz – $0.88/lb = $1.26
Yellow Onions – 2 lb 3 oz – $0.98/lb = $2.14
Celery – 1 bunch = $1.48
Romaine lettuce – 2 heads – $1.58 each = $3.16
Tomatoes – 1 lb 10 oz – $2.24/lb = $3.64
Nectarines – 2 lb 3 oz – $2.48/lb = $5.42
Bananas – 2 lb 15 oz – $0.52/lb = $1.52
Cherries – 2 lb – $2.98/lb = $5.96
Autalfo Mangos – 6 – $0.38 each = $2.28
Blueberries – 6 oz = $1.50
Grand Total: $30.83
Contribution: $15 + $1.50 processing fee = $16.50
Savings: $14.33
Friday, June 22, 2012
Smoothies 101
Fruit- ideally frozen, but not totally necessary
Greens of some sort – spinach or kale (optional)
liquid of some sort – juice, water or milk
sweetener (optional)
protein – yogurt, peanut butter or protein powder (optional)
ice cubes – if you didn’t use frozen fruit
There are two options for fruit. You can use frozen fruit and omit the ice, or you can use fresh fruit and ice cubes. This morning, I used frozen strawberries, frozen bananas and blueberries. I have used mango, raspberries and peaches with success. I really don’t think you can go wrong here.
I like adding something green, like spinach or kale. You really can’t taste it, but it sneaks in a serving of vegetables. I have been using kale lately, since that came in our last baskets. I pull the leaves off of the hard stem and put them in the blender. I use about a cup. If I’m using spinach, I use a couple of handfuls.
If you do not have a super powerful blender, like a Vitamix or a Blendtec, do not despair. I don’t have one of those and I can still do the green stuff. Just add your greens with the liquid and blend them up pretty well before adding the fruit. It will be smooth when you are all done.
If you are not using greens, or you have a mega-blender, just throw everything in together. If you have already blended up your greens, add everything else now.
I have been using water for a long time because I didn’t want to add more calories. I used orange juice this morning for a change and I liked it, too. You just have to experiment to see what you like.
Sweetener is optional, but tasty. I used a splash of maple syrup this morning and I like it. You could use a little sugar or agave, if you’re fancy like that. Or you can leave it out entirely. When I use milk as my liquid, I like to add a tablespoon of Nesquik powder. Yum!
As far as protein goes, a lot of people use yogurt. Both greek and plain yogurt are especially high in protein, so I tend to use those. The most brilliant thing I have done concerning yogurt was to buy a big tub on clearance and freeze it in mini muffin tins. Start by spraying it with cooking spray, then spoon a tablespoon or so into each cup. Put them into the freezer and just pop them out when they are solid. Put them in a freezer bag or bowl and freeze again until you need them. Unfrozen yogurt works great, too. You can even experiment with flavors if you want.
Protein powder is another option. You can buy tubs of it anywhere. I have tried a few brands and don’t really have a favorite, but I have noticed that Jillian Michael’s has a very distinct artificial sweetener taste. I only bought it once and that was enough for me. These powders usually have a hundred calories or more per scoop, so pay attention to the label if you are calorie conscious.
Once you have everything in there, blend it up. If it is too thick, add more liquid, If it is too thin, add ice or more fruit. You will be surprised at how fast everything adds up to make a massive smoothie, so start with small amounts of everything. You will also be surprised at how fast the calories add up, even though they are all worthy ingredients.
There you have it. Now go put Smoothie King out of business and save a bundle by making them yourselves.
I know posts are always better with pictures, but I just keep forgetting to take some. I’ll try to remember to take some next time, but don’t be surprised if I forget.
Thursday, June 21, 2012
Smoothies 101
Fruit- ideally frozen, but not totally necessary
Greens of some sort – spinach or kale (optional)
liquid of some sort – juice, water or milk
sweetener (optional)
protein – yogurt, peanut butter or protein powder (optional)
ice cubes – if you didn’t use frozen fruit
There are two options for fruit. You can use frozen fruit and omit the ice, or you can use fresh fruit and ice cubes. This morning, I used frozen strawberries, frozen bananas and blueberries. I have used mango, raspberries and peaches with success. I really don’t think you can go wrong here.
I like adding something green, like spinach or kale. You really can’t taste it, but it sneaks in a serving of vegetables. I have been using kale lately, since that came in our last baskets. I pull the leaves off of the hard stem and put them in the blender. I use about a cup. If I’m using spinach, I use a couple of handfuls.
If you do not have a super powerful blender, like a Vitamix or a Blendtec, do not despair. I don’t have one of those and I can still do the green stuff. Just add your greens with the liquid and blend them up pretty well before adding the fruit. It will be smooth when you are all done.
If you are not using greens, or you have a mega-blender, just throw everything in together. If you have already blended up your greens, add everything else now.
I have been using water for a long time because I didn’t want to add more calories. I used orange juice this morning for a change and I liked it, too. You just have to experiment to see what you like.
Sweetener is optional, but tasty. I used a splash of maple syrup this morning and I like it. You could use a little sugar or agave, if you’re fancy like that. Or you can leave it out entirely. When I use milk as my liquid, I like to add a tablespoon of Nesquik powder. Yum!
As far as protein goes, a lot of people use yogurt. Both greek and plain yogurt are especially high in protein, so I tend to use those. The most brilliant thing I have done concerning yogurt was to buy a big tub on clearance and freeze it in mini muffin tins. Start by spraying it with cooking spray, then spoon a tablespoon or so into each cup. Put them into the freezer and just pop them out when they are solid. Put them in a freezer bag or bowl and freeze again until you need them. Unfrozen yogurt works great, too. You can even experiment with flavors if you want.
Protein powder is another option. You can buy tubs of it anywhere. I have tried a few brands and don’t really have a favorite, but I have noticed that Jillian Michael’s has a very distinct artificial sweetener taste. I only bought it once and that was enough for me. These powders usually have a hundred calories or more per scoop, so pay attention to the label if you are calorie conscious.
Once you have everything in there, blend it up. If it is too thick, add more liquid, If it is too thin, add ice or more fruit. You will be surprised at how fast everything adds up to make a massive smoothie, so start with small amounts of everything. You will also be surprised at how fast the calories add up, even though they are all worthy ingredients.
There you have it. Now go put Smoothie King out of business and save a bundle by making them yourselves.
I know posts are always better with pictures, but I just keep forgetting to take some. I’ll try to remember to take some next time, but don’t be surprised if I forget.
Wednesday, June 20, 2012
Acorn Squash in the Microwave
This is a really easy and tasty way to cook acorn squash, especially in the summer when nobody wants to turn on an oven. I’ve done it twice now, and it has turned out good both times.
First, let us talk about the different methods of cooking this type of squash. I read a whole bunch of recipes that all basically said the same thing. Cut it in half and bake it in the oven for 45 minutes. That’s too hot for summer cooking, so I kept looking until I found some directions for cooking it in the microwave. It turns out exactly the same, just with the added bonus of taking less than 10 minutes and not heating up your kitchen. If you are like my mother and don’t use a microwave, you could wrap it in foil and cook it on the grill. It would probably take as long as it does in the oven.
On to our recipe. Start by cutting the squash in half and scraping out the seeds. I use a tablespoon and it works great. The skin is pretty hard, so make sure you use a shape knife and be careful.
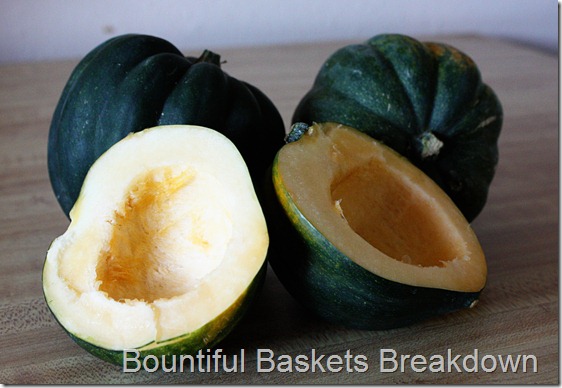
Add a little bit of water, like 1/2 cup, to some kind of microwavable dish. I used this plate as it has a nice lip to keep the water in. Then place the squash halves in the dish with the cut side down. Microwave for 4 minutes.
Carefully, and using potholders, take the dish out and dump out the water. Turn over the squash and add about a teaspoon of butter and a tablespoon of brown sugar into the cavity of each half. I don’t measure it. If you want it really sweet, add a little more sugar. Sprinkle both halves with cinnamon.

Put it back into the microwave, still cut side up, for probably 4 to 6 more minutes. These squash were small, less than a pound each, so 4 more minutes was enough. It should be tender and easy to scrape off of the sides.
I eat these by scraping the flesh off of the sides of the shell, making a bowl. Mix it all up together so that you get the butter and sugar on all of it. Wait a couple of minutes for it to cool and you are ready to eat!
My lunch today was both of these halves, but if you are serving it as a side dish, you could plan on one half per person. Or, in the case of my kids, half of a half would probably be plenty.

I’d love to hear any feedback about cooking these. If you have another method, I’d love to hear that, too. I still have two of those babies to use.
Sunday, June 10, 2012
How to Freeze Bananas
There are two methods that I’ve used to freeze bananas. Actually, there are three.
The first and easiest way is to just throw the whole banana, peel and all, into the freezer. I only recommend this if you are going to be thawing the banana out prior to using it, like if you are making banana bread. You need to let the whole thing thaw before you try to peel it. Otherwise, the peel will be really hard to get off. Also note that the banana inside will be kind of slimy and mushy, but that’s okay because you’re just going to mush it anyway. You will need to use these within a short time to avoid the freezer taste. I used this method for a long time before I moved onto making smoothies using frozen bananas. For that, I used method number two.
Method number two is individually wrapped bananas. Peel the banana first, wrap it in plastic wrap and then freeze it. I usually break them in half, or in thirds if it is a big banana, before wrapping it. After I wrap them all up, I place them in a gallon sized freezer bag. This makes it easy if you only need one banana at a time. The double wrap also gives them good protection from the freezer.
The last method, and one that I just recently adopted, is to slice the bananas and then freeze them. I think this is going to make them blend up a little easier, especially if you don’t have a super fancy blender. I sliced these in about 1/2" slices, put them on wax paper on a cookie sheet, then put them in the freezer. Once they were good and frozen, I popped them off of the paper and then put them in a freezer bag. This will allow me to use as much or as little as I want.
Saturday, June 9, 2012
Basket Breakdown 6/9/12
Romaine lettuce – 1 – $1.48 each = $1.48
Acorn squash – 3 lbs 11 oz – $1.28/lb = $4.88
Cucumber – 3 – $0.64 each = $1.72
Kale – 2 bunches – $1.48 each = $1.48
Honeydew melon – 1 – $2.50 each = $2.50
Corn – 6 – $0.25 each = $1.50
Tomatoes – 1 lb 2 oz – $1.74/lb = $1.96
Mangos – 2 – $0.63 each = $1.26
Granny smith apples – 2 lb 9 oz – $0.97/lb = $2.49
Plums – 1 lb 15 oz – $2.98/lb = $5.77
Apricots – 1 lb 7 oz – $2.98/lb = $4.28
Contribution: $15.00 + $1.50 handling fee = $16.50
Wednesday, June 6, 2012
Vegetable Sausage Soup
This soup is one that I came up with last fall to use up some yellow squash and zucchini from my garden. I made it tonight with the intent to use up the carrots that seem to be never-ending. Let’s face it, four pounds of baby carrots is a whole lot of carrots! You could use whatever vegetables you have on hand, really.
The ingredients (since I don’t really measure, all measurements are approximate):
Smoked sausage (the package is just to show what I used since I had already chopped it)
Water
Carrots
Zucchini
Yellow Squash
1/2 tsp Onion powder (or chopped onions)
Diced tomatoes
1 tsp Italian seasoning
1/2 tsp garlic powder
1 tsp salt (missing from picture)
Some type of noodles (also missing from picture)
I start by sautéing the sausage right in the pot that you’re going to use. I was just making enough for my husband and me for dinner, so I used half of a package of sausage. You don’t need to add any oil to it because it has plenty of fat. Let it cook up until it starts shrinking. Stir it around every once in a while.
Then add all of your chopped vegetables and seasonings. Add enough water to fill the pot, or at least to cover everything up good. Let it simmer for at least an hour, adding more water if needed. I let this cook for probably about an hour and a half and it was just right.
The next step is adding the noodles, so make sure that you have enough water and that it is simmering. Add some noodles. I used rotini tonight because that box was already opened. You can use anything. I also don’t like to add very many noodles, probably about a cup for this batch. I pretty much just use enough to make my husband feel like he’s eating something more than vegetables.
Speaking of him and vegetables, he is not a vegetable eater. He has Crohn’s Disease and most vegetables do not agree with him, especially broccoli and lettuce. This soup, however, he can eat without a problem. In fact, he really likes it.
If you feel like you still need more vegetables, serve this with a salad on the side. I polished off the last of the romaine and tomatoes from the last baskets along with this. I also served it with crescent rolls. Grilled cheese sandwiches would be good with it. It really is a light meal and makes use of a lot of vegetables.
